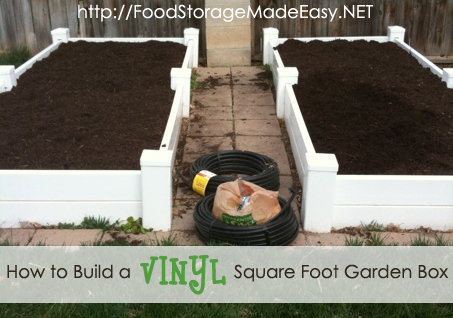
Whenever I post pictures of my gardens on our Facebook Fan Page people always ask where I got them or how I made them. Well the answer is … I have an amazing husband 🙂 He has been sweet enough to make a tutorial for you to show how to make a simple 4×4 vinyl garden box. Feel free to watch the video at the bottom of the page, but I have also tried to summarize his instructions if you don’t want to watch the whole thing.

How To Build a Vinyl Square Foot Garden Box
Materials Needed:
4″x4″ vinyl post jackets (found in either 72″ or 100″ lengths)
– You can also use 5″x5″ vinyl posts but they have holes pre-drilled in incorrect places)
Vinyl fence slats (found in 16′ lengths)
– You can make your boxes one slat high, but I prefer to do them double
Fence Post Caps (optional)
– You don’t NEED these but they make the boxes look so pretty!
Liquid Nails (optional)
– Can be used to glue the two layers of slats together if you are worried about stability
Tools Needed:
Tape Measure
Pencil
Straight Edge/Ruler
Table Saw or Sawzall or Circular Saw or Hacksaw (to cut vinyl into segments)
Jigsaw or Sawzall or Hacksaw Blade (to cut the post holes, jigsaw works best)
Posts
Measure post lengths to give you 1-2 inches of space at the top, and 4-6 inches of space at the bottom. Then give yourself either 5 1/2 or 11 inches for the slats (depending on whether you are doing one layer or two). Cut 4 equal segments. If you are doing a longer box, you will need to add 2 additional posts to give it more stability in the middle.
Side Slats
Determine the size of box you want to make. For a 4 foot square box you would ideally give yourself a few extra inches on each side since they will be stuck into the posts. However, since the slats come in 16 foot lengths we opted to just make our box a little smaller. Cut into 4 equal segments. Again if you are doing a longer box, make additional slats as necessary. Don’t make the slats longer than 4 or 5 feet in length.
Post Holes
Draw yourself a template for the holes. Start down 1-2 inches from the top of the post (depending on what you measured for). Make sure to mark the center of the post. Measure your fence slat (should be about 1 1/2 inches) and mark that width down the post starting from the center. So you will have 3/4″ on each side of the middle line. You can either measure 11″ and draw the lines, or simply trace around your fence slat to get a pretty good outline. Use a large drill bit to start a hole in the outline. Then using a jigsaw, cut out the hole. You will need two holes per post and they should be on sides right next to each other.
Assembly
If you glued your two layers of slats together, wait for them to dry. Then stick the fence slats into the holes you made in the posts and form your square foot garden box. Once you determine where your box will go, dig holes in the ground for the four post holes and stick your box in! We like to fill our posts with dirt after to make them more stable. Then stick on the post caps for a beautiful finishing touch.
Cost of a 4’x4′ Box (all parts from Home Depot)
72″ vinyl post jacket – $15.97
16′ vinyl slats x 2 – $29.94
Fence post caps x 4 – $6.68
TOTAL COST – $52.59
Time Required
A simple 4×4 box like the one we built can be done in an hour or so. Depending on how much of a perfectionist you are with the measuring and cuts it could take a little longer. If you have a table saw and a jigsaw it could take a little shorter. To do a bigger box with more cuts and more complex measurements it will longer as well. Also if you choose to glue the slats together it’s best to let them dry overnight.
Hope this is helpful! If you or your spouse makes one of these boxes let us know in the comments how it works out for you.

-Jodi Weiss Schroeder
http://foodstoragemadeeasy.net

